Minor Bend & Break 2023/2024
November and December 2023
dr.ir. P.C.J. Hoogenboom (p.c.j.hoogenboom@tudelft.nl)
5 credits (ECTS)
Each team of three students will design, build, analyse and test a shell roof model. The roof can be a timber grid shell or a reinforced concrete shell. Provided are workplace, materials, tools and software. You will describe the activities in a team report. The course is about four weeks, full time, after which there will be an individual exam.
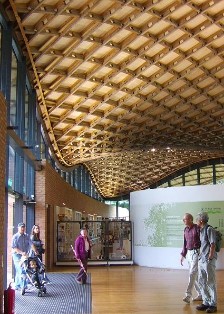
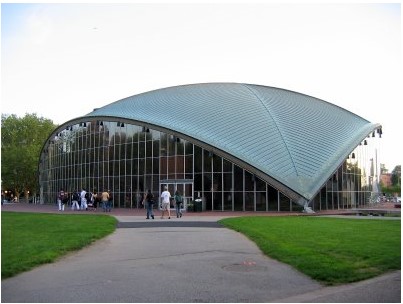
Savill Building, Winsor England [1] . . . . Kresge Auditorium, Boston USA [2]
Provided are wood laths, card board, cement, sand, plaster, steel wire, nails, screws, rope, tape, glue. Talk with the teacher about additional materials. You can also bring materials.
Provided are workplace, saw, hammer, pincers, screw drivers, scissors, bucket, trowel, drill, drill bits, screw bits, scale, test weights. You can also bring simple tools.
- Radius of curvature (CIEM5301 reader p. 1 [4]), shell membrane force formula (p. 38), edge disturbances (p. 14), shell buckling formula (p. 139) and imperfection sensitivity (p. 142)).
- Practical, Install SCIA Engineer in advance (Google "SCIA" and "campus"). Follow the instructions in handout 6.
- Suppose your shell is 1/10 of the real one. You observe that a 1 kg point load on your shell gives a deflection of 10 mm. Consequently, a 100 kg construction worker on the real shell gives a deflection of 100 mm. Is this okay? If not, you need to make your shell stiffer (scaling rules).
- Stress in a dome top: Suppose you designed a reinforced concrete dome. It needs to carry p = 4 kN/m2 (Selfweight + snow of the real shell). The stress in the top is -1/2 p a / t, where a is the radius of curvature and t is the thickness. The crushing stress of homemade concrete is about 5 N/mm2. If the stress is too high you need to increase the thickness.
- The recipe for concrete is 1 2 3. 1 bucket of cement; 2 buckets of sand; 3 buckets of stones (called toeslagmateriaal in Dutch and aggregate in English). The teacher recommends the following recipe for miniature concrete: 1 cup of cement, 2.5 cup of metselzand < 2 mm. First mix then add some water then mix further. If it is too dry, it will not become hard. If it is too wet, is will slide down. Fill a few paper cups with your concrete. We can later crush these to determine the strength.
- Foundation stress: The stress in your shell at the foundation needs to be checked. The vertical load on the shell foundation (frame) is load over number of support points. The normal force in the material is determined by a parallelogram of forces. Stress is normal force over area. Is it too large?
- Spatkracht: The vertical load on your shell foundation (frame) is load over number of support points. There is also a horizontal force on your foundation. This is called spatkracht in Dutch. (The teacher does not know a translation into English.) We use a parallelogram of forces to calculate these. The foundation (frame) needs to carry the spatkrachten too.
- Rope strength: The specified strength of the yellow rope is 1 kN. In a simple test, it broke at 0.5 kN. The strength of the white rope is 1.7 kN (specified). The strength of the orange rope is 7.5 kN (specified).
Cement and wood cubes can be tested before the shell experiments to determine the material compressive strength.
Agree with the teacher on a suitable time for testing. Before the experiment, you will hand in the team prediction of the collapse load.
Your shell models will be tested with a distributed load that is slowly increased. Observe cracking and deformation (make photos). Measure deflection and collapse load. Film the loading process and the collapse. Figure out what happend; first crushing or first buckling or did collapse start with a rope breaking?
The team that tests is responsible for the safety of other people in the lab. These people shall follow instructions by the testing team promptly.
If the test setup fails during testing, we try to fix it. If it cannot be fixed, the test is done.
If all bricks are used and the shell has not collapsed, the distributed load is replaced by a concentrated load. The team makes a new prediction of the collapse load.
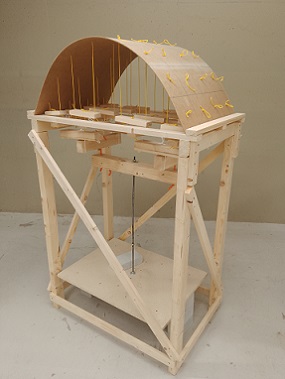
Shell model test by Heinz Isler [3] . . . . . . Example of load distibution and load plateau
How large can we build a roof? ... A wood shell model has a roof surface area of 0.83 m2. Its mass is 349 gram. Self-weight per roof surface area is 0.00349 / 0.83 = 0.0042 kN/m2. The model collapsed at 225 kg evenly distributed over its surface. Per surface area it carried 2.25 / 0.83 = 2.71 kN/m2. The real shell can carry this too (see scaling rules). The real shell needs to carry its selfweight and 1 kN/m2 snow load. So, 2.71 / 2 = 0.0042 x + 1, where 2 is a safety factor and x is the scaling factor. The solution to this equation is x = 85.
Your group will write a report. The report needs to be understandable for well-educated engineers. Include design drawing and dimensions. Include the design and building process (photos). Your experiment needs to be reproducible. Don't hide mistakes that had important consequences. Include wat you learned from the experiment (Conclusions). Include a chapter on the real size shell, so not the scale model ... can it be build? .. will it deflect too much? .. will it be safe?
The teacher will write ten open questions on your project. If you seriously participated in all steps, it will not be difficult to provide correct answers.
A calculator will be needed. During the exam, it is allowed to use your report, notes, computer, tablet, software, internet and chatGPT. Obviously, it is not allowed disturb others or to communicate with others during the exam. It is not allowed to use a phone. It is not allowed to use software with which one can communicate with people.
Example question 1: We made the models of pine wood laths 4 mm x 8 mm, 500 mm long. Somebody will bend similar laths (dry and cold) to a curvature of 1/m. Will most break? Explain your answer.
Example question 2: If your real size shell roof were built, it would deflect due to selfweigth. How large is this deflection? Explain your answer.
(Subject to change.) We expect you in the lab every working day for seven hours. You can get permission to do computer work elsewhere (online search, drawing, computing, writing).
| 16 Nov. | 13:45 hours Stevin II lab blauwe vloer. Introduction. Build your toolbox. Become familiar with the materials. Design with your hands. What can we build? Go online and find out what is out there. Keep in mind that the construction method needs to work for the real size roof too. Record your ideas (photos, keywords, sketch) in the first version of the report. |
| 20 Nov. | Agree with your team on what to build. Write the arguments for selecting this design in the report. |
| 21 Nov. | Make a technical drawing of your shell, include all dimensions accurately, calculate the required thickness (concrete selfweight 3 kN/m2 plus snow 1 kN/m2). |
| 22 Nov. | Two hour lecture on edge disturbance and imperfection sensitivity (13:45-15:30 hours, room 3.02). The shell will be built on a testing frame under which weights can be placed. Design this frame and build it. |
| 23 Nov. | Today we present the designs (8:45-10:30 hours, room 1.96). Your team has 10 minutes. Make a nice powerpoint. Your classmates will ask critical questions. Afterwards, you may want to improve the design. |
| 23 Nov. | Bring your laptop and install SCIA Engineer. Two hour practical lecture on shell finite element analysis (13:45-15:30 hours, room 3.02). |
| 24 Nov. | Do a hand calculation. Model your shell in a finite element program. Perform a linear analysis, a linear buckling analysis and the non-linear buckling analyses. Add this to the report. |
| ..1 Dec. | Today we tested a pine wood specimen 20 x 47 x 150 mm. The fibres were in the length direction and the specimen did not have knots. Compression was applied in the fibre direction. The peak load was 52.9 kN. The stress was 52900 / (22 x 47) = 51 N/mm2. At this load the wood fibres crushed at the bottom of the specimen. Later, we will test concrete specimen too. |
| ..4 Dec. | Time to cast concrete, it needs to be hard on the 12th. |
| ..6 Dec. | Drill holes in the shell to apply the evenly distributed load. Build a system of beams. |
| 12 Dec. | Today, teams 2 and 10 tested. You can test when you are ready. Before the test, hand in your team's prediction of the collapse load. Increase the load in small steps. Measure the deflection. Make photos for the report. How do cracks develop? Record the collapse load. Did it first crush, yield, fracture or buckle? Does this agree with the analysis? How are the experiments of the other teams going? |
| 13 Dec. | Team 4 tested. It did not collapse. Team 1 tested their concrete specimen and their shell. It did not collapse. |
| 15 Dec. | Team 1 tested the red rope, the distributed load and a point load. Team 7 tested the distributed load. |
| 18 Dec. | Team 6 tested the distributed load. Team 3 tested for distributed load and a point load. Team 4 tested for distributed load. We applied all bricks and it did not collapse. |
| 19 Dec. | Team 5 tested for distributed load. |
| 20 Dec. | Team 9 tested concrete specimen, for distributed load and for point load. |
| 21 Dec. | Team 4 tested for point load. Team 11 tested for distributed load. |
| ..1 Feb. | Hand the report in. |
| ..2 Feb. | Exam, 9:00-12:00 hours, building 3ME, room J |
| 18 Apr. | Exam, 9:00-12:00 hours, room ... |
| Process | ..9% | Were you present and on time? Did you cooperate well in your team? Did you show initiative? Did you clean your tools? ... |
| Difficulty and amount of work | 17% | Does your team take on challenges or avoids them? |
| Experiment | 26% | The team that predicts the experimental collapse load best gets a 10. The second best gets a bit less; down to 3. |
| Team report | 18% | Complete structure, good English, clear narrative (but not just a diary). Observations and calculation results need to be reproducible (include photos, calculation examples, intermediate results, tables, graphs). Facts need to be true. Especially include facts that show to be important for the analysis results and experimental results. Discuss what went right and what went wrong. Draw conclusions on the real size shell roof. Discuss the experiments of other teams shortly. |
| Individual exam | 30% | If you participated in the whole process, it will not be difficult to answer ten questions about your shell. It will be an open book, written exam. |
| Predicted collapse load | Experimental collapse load | Collapse mode | Experimental collapse load * | |||
| Team 1 | 2.50 kN = -2 % | 2.54 kN | point load, crushing and punching shear | .> 1.72 / 0.627 = 2.7 kN/m2 concrete | report | feedback |
| Team 2 | 1.25 . . . = -52 | 2.59 | buckling then breaking of the laths | . . 2.59 / 1.22 . = 2.1 . . . . . . timber | report, movie | feedback |
| Team 3 | 2.18 . . . = -7 | 2.35 | point load, punching shear | .> 3.10 / 0.550 = 5.6 . . . . . . concrete | report | feedback |
| Team 4 | 1.96 . . . = +68 | 1.17 | buckling at the point load | .> 5.09 / 0.580 = 8.8 . . . . . . timber | report | feedback |
| Team 5 | 2.00 . . . = +0.5 | 1.99 | local buckling | . . 1.99 / 0.245 = 8.1 . . . . . . timber | report | feedback |
| Team 6 | 1.70 . . . = -39 | 2.80 | buckling of the laths | . . 2.80 / 0.286 = 9.8 . . . . . . timber | report | feedback, feedback |
| Team 7 | 2.56 . . . = +77 | 1.45 | buckling of the laths at a damaged location | . . 1.45 / 1.052 = 1.3 . . . . . . timber | report | feedback |
| Team 9 | 6.50 . . . = +48 | 4.40 | bending at the point load | .> 3.50 / 0.647 = 5.4 . . . . . . concrete | report | feedback |
| Team 10 | 1.50 . . . = -54 | 3.24 | buckling then breaking of the laths | . . 3.24 / 0.831 = 3.9 . . . . . . timber | report | feedback |
| Team 11 | 2.50 . . . = -43 | 4.40 | foundation collapse | .> 4.40 / 0.231 = 19 . . . . . . . timber | report | feedback |
* distributed experimental collapse load per roof surface area
subgrade = 10 - 9 |1 - pred / exp|
After the individual exam, students were invited to give feedback on the course. Results summery. Detailed results
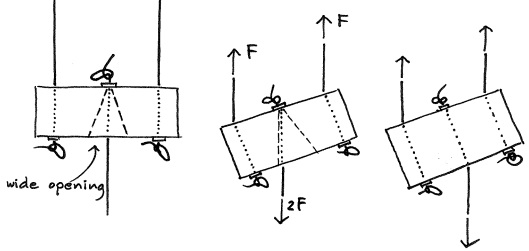
The middle hole of a distribution wood needs to be wide at the bottom. Otherwise, the deformation is forced symmetrical and buckling is suppressed.
1. https://adamcoupe.com/savill-buiding-architecture-photographers/
2. https://www.pinterest.com/pin/495325658988098991/
3. J.F. Abel, J.C. Chilton, Heinz Isler - 50 years of "new shapes for shells": Preface, Journal of the IASS (International association for shell and spatial structures) Vol. 52 (2011) No. 3, p. 131-134
4. P.C.J. Hoogenboom, Notes on Shell Structures, Reader Delft University of Technology, 2023, online: https://phoogenboom.nl/b17_schedule.html
After the course, students will have improved the following skills.
- Working in a team
- Designing structures
- Developing realistic construction methods
- Working with wood, cement, plaster and other materials
- Analyzing shell structures by hand and computer
- Performing scientific experiments
- Drawing conclusions on live size structures from scale model tests
- Writing reports in English
Gereedschapskist 10 stuks
Underlayment 18 mm 3 platen
Scharnier 20, kistsluiting 10, hangslot 10 (3 sleutels)
Accuboor 10
Schroeven torax 150 x 20 mm, 250 x 60 mm
Schroefbit T15 en T20 10 stuks
Inhoud van gereedschapskist
Schaar, hobbymes, zijkniptang, punttang, hamer, zaag, potlood, haak, boortjes, lijmtang, elk 10 stuks
Ontwerpspullen
Latjes 3 x 7 mm, 500 mm lang, 100 per model
Stucloop (karton om bekisting mee te maken)
Touw, ijzerdraad, tape, lijm
Spijkers, klein en groot
Metselzand <2 mm 3 zakken 25 kg
Cement, CEM 52,2 1 zak 25 kg
Gips, 1 zak 25 kg (bepleisteren van de schaal om scheurvorming zichtbaar te maken.)
Folie (beton afdekken)
Stellingen
2"x3" 47 x 75 mm 15 stuks van 3.6 m en 18 stuks van 3 m (poten 1.2 m, scheien, verdeelhout)
Raggels 22 x 55 mm, 80 stuks van 3 m (schoren, verdeelhoutjes)
3 platen underlayment 18 mm dik (werkblad voor ronde modellen, ronde schijfjes)
Boortje 3 mm
Schroeven torax 50 mm en 35 mm
Houtlijm
Proefbelasten
Spaanplaat 6 mm, 1 plaat (ronde schijfjes voor proefbelasting, 200 schijfjes nodig)
Grote-gaten-boor 50 mm en 85 mm
Vilt 10 mm (voor onder ronde schijfjes)(geknipt uit mat voor onder wasmachine)
Verdeler
Boortjes 5 mm, 10 mm, 12 mm
Touw
Kalkzandstenen 300 stuks (voor proefbelasting; steen = 2.1 kg)
Plateau 2 stuks
Algemeen
Beitel, vijl, schroevendraaier, boortjeset, verlengsnoer, houtlijm, schrobzaag